Showing posts with label DIY. Show all posts

Monday, September 15, 2014

Mmm, Pumpkin.

Say it with me "FALL FLAVORS!". But more importantly, Pumpkin flavors.

They are the ice to my cream, the Kanye to my Kim, the binge to my Netflix watching. If you can't tell I'm all for Pumpkin flavors. 

I even had a mini meltdown the other day when my Starbucks location temporarily ran out of PSL for the day. I quickly recovered and ordered something else, but this is my favorite time. Next to Christmas...which is a whole different story for another time.

Concentrate! Over the weekend I got to baking...I forgot how much it relaxes me. I put on a movie and got to baking. I had some zucchini left in the fridge that was asking to be used in something other than a side dish. So I listened, and I heard the canned pumpkin in the pantry with it's soft cry, "pick meeeeee, you like meeeee, I'm next to the soup cansss". I rounded up some pantry items and ran to the store for some last minute items. 


Two hours later. I had made Pumpkin Zucchini Bread as well as Pumpkin Pie. During the process my house smelled amazing, it still actually does! I just love baking! These recipes are very easy and the Pumpkin Pie recipe is actually attached right to the can of Pumpkin. Just in case you need to refer to it, you know while your hands are covered in flour, egg and pumpkin filling...and you don't want to touch your screen to your smartphone while figuring out how many TBSP you need next. Been there. Licking off the evidence as we speak. Say what?!


Just click the links and they will lead you right to the recipes. Enjoy!
xo. 

Wednesday, March 12, 2014

A wooden box with no home

Before I get into the bulk of this post I just wanted to say stay safe and warm everyone in Buffalo,NY today. Don't travel if you don't have to! I can actually believe I am typing this sentence, which is sad, but I can't believe I am actually seeing this happen...To say this winter has been bad is an understatement. Today we got issued a blizzard warning until 2am Thursday. This is the second blizzard warning we got this winter. We are expected to have storm totals of 16". Craziness. Yesterday it was a high of 48° today, we have a march blizzard. Cool. 

So one of our local craft stores in the area is closing, which means crazy close out discounts. Right now they are running 40% off everything and they will eventually get to 90% off. This little wooden box caught my eye as I was running around the store grabbing as much as I could. 

How charming and precious is this little box that could? This was very unlike me to buy something that I had no end use for within crafting. But you know what? I'm so glad I grabbed this, and for only $2.99 if it didn't work out its not like I broke the bank.
For this project is was thinking a tri tone with a nice beefy stain on where the cut outs are to showcase the beautiful craftsmen ship.
I've used these stains once before, and I'm kind of obsessed. They are just as small as a normal acrylic craft paint bottle and they go on very easy and they don't smell as much as normal stains. I started first by doing the staining.
I decided the oak stain was getting lost with what I envisioned so I took the walnut stain and applied it over my oak stain, the result was actually exactly what I was looking for.
Then I just started to paint a lighter grey around the top edge and a darker moody grey on the bottom half.
The inside of the box I wanted a pop of color, but before I could do that I had to apply the stain to the inside cutout panel. 
With all staining you want to make sure you are removing excess stain and to stain with the grain. 
I just painted the insides and the lips of the wood pieces the same colors as the outside and the I chose my pop color, a lilac.
Four coats later, that's right four coats! The wood they used to make this was very absorbent. But once it was painted I really really liked it.
Once it was dried, it need a home. Currently it's been living on a small shelf in my bedroom, but I have a feeling it will be moving around my home a bit before it finds it's perminant home. 
It's actually not too bad there. It's been on this shelf now for about two weeks so I'm definitely living with it a bit before I move it. 


Monday, February 3, 2014

Simple Rosettes

I am one of those people who go on Pinterest, pin something and then either one of two things comes out of my mouth:
Option one "wow, this is amazing I'm going to do this, save this for later and it will look/taste exactly like what I pinned" (which is said about 95% of the time but I end up forgetting I pinned it! never get around to it or the pinned item doesn't end up like how it's suppose to when I try)
Option two " lets pin this and try to find an easier way and just use this as a guideline" This is what happens 100% of the time. If I can find an easier way to do something, a cheaper way or a way to use it as inspiration and create my own thing in the end, I'm all in. 

So option two it is. I have seen these fabric or felt roses around Pinterest all the time. I have read tutorials, I have watched YouTube videos. My roses never looked like anything anyone should be proud of or put their name on. I'm a very creative person, so it annoyed me to no end that I couldn't get the cutest detail in all of crafting to work. That is until the night I just did my own thing...


Isn't it just the cutest thing you have ever seen????! You better be shaking your head, smiling or clapping while saying "Yes". If not, don't worry I'll say it for you. I am still so proud I figured this out. It's not the best rose but you know what, it's cute, it looks like an actual flower and I did it using two tools anyone who doesn't craft has in their house. Now tell me you're not excited to find out how I did this!


I'm a very visual person but I also welcome the fact of directions as a crutch. Just in case something doesn't go right, or my phone dies (because let's be honest that thing is always on my person and where I google) I can rely on written directions.

1) To create the roses, you will need a piece of felt, a pair of scissors (tool #1) and masking or painters tape (not pictured, tool#2)

2) with your scissors, cut the desired amount of fabric you want, however big you want your flower just make sure you cut a square or rectangle. But don't cut the square or rectangle as big as you want the flower, if that makes sense. You will have to cut it and twirl it so you'll want to accommodate for that.

3) This is your fabric you will be working with before you "mold" it

4) Start at one end and in a circular motion cut in a swirl-ish direction. That's totally a word, ok probably not but let's pretend! Think Apple peels, or porkie pigs Q tail, or a spiral.

5) Your felt should now look like this or something similar once you are done cutting

6) With your scissors you want to create the "pedals", to do this you just cut scalloped edges into the swirled cut felt. The bigger and wider the scallops the bigger and wider your pedals. 

6a) Not pictured because I needed both hands, sorry. Take the smallest end of your swirled felt and fold it into itself, this creates the bud of the rose, then just wrap the rest of the fabric around the bud, it should start to look like a flower, make sure the bottom of the rose is flat. When all the fabric is wrapped, just take a small piece of tape and tape the end to the side to keep it together. You can also hot glue it closed as well. UPDATE: I have had my roses taped now and hung somewhere for over a week and they are holding up just fine and haven't unraveled. 

7) you just made your first rose! Keep going at it!! 

These roses are a sneak peek for a post coming later this week! Stay tuned!


Lovely lil sign

One night my sister! Jackie, and I went crazy with the crafts. Over two nights we each did three crafts. We're talking more than an hour crafts, that's serious craft time. I loved every minute of it and what came of it.

Spending time with my sister is one of my favorite things to do but crafting while doing it is a double bonus. Now that it's finally close to valentines day...how is it only in eleven days?! I can finally share with you some of the crafts we did.

I love love. I also love cute inexpensive DIY crafts. And I love to paint. I love that this little sign is all that and more. It has so much potential in this world. Can't you see it on a bookshelf? Or a desk? Or a mantel? Or shelf in the living room? On the living room end table...seriously stop me I'll name every surface for this lovely sign to rest.


Isn't it just so adorable? I found it at Joann's on an end cap and it was marked down from $5.99 to $4.99 then 50% off? WHAT WHAT! Cue Cupid coming in on his wings, I was in L-O-V-E.

It didn't always start off this charming...
It's a very thin wood material, like most of the wooden crafts at Joann's and Michaels, but I didn't care. I didn't have a plan for this little nicknack, which is very unlike me. I decided to just paint it all white with acrylic paint and a craft brush in hopes that a crisp white surface would give me an idea.
From there I had it! I was going to paint the LOVE portion red and use the crackle medium acrylic paint over it. I apologize for not taking a picture of this step, I was just so excited. All you do to create the crackle effect is paint the surface your color you want your cracks to be, then after that dried you paint the crackle paint over top. This paint is very soupy and almost looks like snot, you think I'm kidding but I'm not it's the best comparison I could make. Wherever you paint the crackle paint is where it will crackle. You let that dry, then paint over everything your final color, once that dries the cracks will form and you will have a rustic crackling sign. It took about an hour for the crackle paint to dry before you could put the final paint layer on.

Then, once it was all done, I left the base white, I decided it needed something. So I turned to washi tape. This is a recent obsession of mine. There are so many cute patterns and you can get a roll for under $2 and it will last you for a long time. Trust me, I did a whole Disney scrapbook with a roll and still have some left. 

Again, I didn't take a picture of this step, sorry! Eek! But I chose the red hearts, I just laid the pieces of tape down onto the base to cover it and clipped around the edges so it was all the same length.
And now it lives on my end table! I love easy crafts like this, and seasonal crafts!


Tuesday, January 7, 2014

Please don't break, please don't burn me.

...was being said over and over in my head during this whole process.

I decided to get crafty this year with one of my gifts. I wanted to paint wine glasses for my secret Santa. I've done it once before and it didn't really work. My sister and I were planning her wedding and this is about the time Pinterest really blew up, especially for all things wedding. We found it online that we could paint our own glasses, so like most things we tried it. It went okay but not like we invisioned. 

That is until I tried it once again. Moral of this story: if you believe it will work, if you believe in the project, if you believe you won't get burned as you put the glasses in the oven (more on that later), if you just believe it will all work out. And work out it did. I love them so much, I may make a set for myself.


I really really love how they came out. I'm glad I decided to paint the wine stems all black, it's more classic and really let's the polka dots shine. 

For this I just went to Target to get the wine glasses, originally I was planning on getting 4 but didn't know if they sold them in a set or separately. They thankfully did, so I was able to put the finished product back in the box and wrap it later on. 

Besides the glasses I had everything else on hand. I'm a craft hoarder. Seriously, name me something I probably have it or have something that could work in its place. 

This next part is really important. I didn't take a picture of it (eek, dummy alert) before you do anything to the glasses, wipe them down with hydrogen peroxide. This helps clean the surface and allows the paint to grab onto a fresh surface. 
If you follow me on Instagram you may have seen this sneak peak. Now you know what I was doing! I chose black, purple and raspberry pink. The pink isn't very raspberry, but it actually worked, labels lie sometimes.

Make sure you are painting with enamel paint. While I understand there are other paints, enamel paint is what you need for this project. Acrylic paint will do the job but once you wash it, all your hard work will be gone. Trust me from experience. Enamel paint.
I just took the rounded edge of one of my paint brushes and dipped in into my black paint. With no real grid or guideline I just started to dab,dab, dab the paint brush around my glass to create polka dots.

I did this with all the colors, but I finished one color before going onto the next.


Painting the stem was a challenge, the outside of the glass was still wet and I couldn't hold the stem to paint it. So I just put my hand in the glass and held it as I painted, this was the best way to do this.

I just took my black enamel paint and painted the stem and the bottom. Making sure you couldn't really see any brush strokes (thank you art classes) and made sure the surface was covered with enough paint. Do not glob it on, the stem is the hardest point to paint on the glass because of its small surface area, but if you use just enough paint it won't drip onto the sides or glob up. Glob up is so a phrase, btw, you can use it now. 

 Once you're all done painting, you need to preserve your work. If you're like me and don't have the full 21 days to let it air dry ( and let's be honest if we air dried it, I would probably touch it to see if it's done and then have a paw mark on it forever) you can just do the other step which isn't complicated at all. Preheat your oven to 350° and place your painted wine glasses on a cookie sheet. 

Make sure they aren't touching but they are just enough apart to balance the cookie sheet since they are so light. 

Then carefully, while chanting in your head "please don't break, please don't burn me" over and over again, place them on the top rack of the oven for 15 minutes. The bottle says 30 minutes, oven heatness varies, but at 15 minutes I was getting nervous. So nervous that I was starting to think the heat would shatter the glass and then I would be spending my night cleaning out glass in the oven. So 15 minutes worked for me. No shattered glass and preserved painted wine glasses for me.

I also said the chant over and over in my head while taking them out. Let them cool for about an hour on the cookie sheet. Then carefully remove them and you just made a painted wine glass!

Enjoy!

Friday, January 3, 2014

Resolve!

...New Years Resolutions....

Raise your hand if you make them and then by March, sadly you have either forgotten what you resolved to do or just simply didn't have time to follow it through. Raise your hand if you resolve to do the cliche "Get healthier, Eat Better and Work out". Raise your hand if you have resolved to not make a resolution and wished you had.

I've had my hand up, and I know you did too.

This year is going to be different. I'm really looking forward to 2014. I have a feeling this will be the year of change and growth, for the good. This year is going to change my life, I will be graduating with a BFA in a short five months (Eeek!) and will finally be in the "real world". It's crazy to think about.

In years past I've made new years resolutions that I wasn't passionate about, but not this year. I will be making small resolutions that I can actually accomplish. Because let's be honest here, saying you will do a detox every month and go to the gym three times a week...it gets old once you taste that first sip of tasteless liquid while you look like you just ran a marathon but really all you did was do a push up.

The gym is just not for me, it's a lifestyle that one day I will probably pursue, but in the mean time...I'm good.

So here is what I resolve to do this year:

1. Learn How to Crochet
I have heard from many friends and acquaintences that it's a personal preference, if crotchet or knitting is easier than the other. I have knitted in the past, and found I didn't stick with it. So, I want to learn how to crochet. I'm going big on this one, I'm not looking to make a scarf here. A friend of mine has a gorgeous and I mean gorgeous hand crocheted blanket. I love a good blanket. Here are some inspiration photos of what I'm thinking...I'm really leaning towards a grey color palette with hints of black and a pop of color like pink or magenta. That way this blanket can live anywhere since it's so neutral.

2. Unplug 
I will be the first to admit that my phone is always on my person, and 95% of the time I'm on it. If i'm not on my phone, I'm on my other devices. I am a very creative person and have found myself lately saying "I wish I could just sit and do this and not have a distraction". Hello!! Once a month I'm going to unplug from everything for the whole day and do something I would probably not get around to because life gets in the way. I may craft, continue to crotchet my blanket, paint, get to that pile of laundry, who knows really! I think it's going to be hard but well worth it.

3. Learn more recipes to bake and cook
I love to bake, it relaxes me. That may sound odd, but after a long day I would rather bake some sweets. Cooking panics me, like near panic attack. I like to know how much of an ingredient I need to put in, just throwing in whatever and not measuring, lord help me. I'm going to try to cook more, and bake more. I want to save up some money and maybe for my birthday buy myself a kitchen aid mixer. I was gifted a crock pot for christmas and I couldn't be more excited. I'm searching for recipes!

Can't wait to check in a few months down the line to see how I'm doing on these. Of course I'll be keeping the blog as well and updating, growing, learning and sharing this whole experience. So what about you? What are your resolutions?

Monday, December 30, 2013

Wreath in the New Year

Christmas time has come and gone. How can that be?

I feel like the tryptophan got the best of me, I took my annual after-thanksgiving-meal-snooze-sesh and woke up to gifts under the tree all wrapped and ready to be opened.

Not complaining there, Santa was very good to me this year. Being able to spend the holidays with my loved ones is what I treasure most and I got to do plenty of that this holiday season. However, it flew by. Faster than Comet, the reindeer. And that's fast, I would know. I love Christmas.

During the holiday season I did get a chance to do some crafting. Not as much as I hoped (possible new years ressie anyone?!) but I had enough time to sit down and make another wreath.

Since my first wreath experience turned out well, I gave it another go. I'm smitten.
The colors are a bit more christmas with the cream and red, but it can live throughout the holiday season and into the new year. Wrapping the wreath this time with the yarn was a bit harder than my first wreath that I've made. To figure out my "peppermint" theme I wrote on the wreath to make a grid. This grid I could follow as I wrapped. I just wen every other, red then cream then red and so on. 
After two hours I finally had a peppermint looking wreath, it helps if you put on a Christmas show while you wrap so you've got some entertainment. Just make sure you don't wrap into a different color section!
After that, I took out the hot glue gun and added some embellishments I had leftover from the holidays. I think my favorite part of this wreath are the little jingle bells. Sorry to the snowflakes, they didn't make the final cut. They kind of disappeared and seemed out of place, maybe next year snowflake, maybe next year. 
Hearing those bells every time someone comes into my home make me smile. It's the little things...

This wreath took me the same amount of time as the other did. I did have to stop for a few days because I left it at my sisters home, but we're going to pretend we didn't pause on this project due to forgetfulness. 

I'm really proud of this Christmas spirit wreath....


Wednesday, December 18, 2013

Wardrobe Wednesday

We have a special guest today...Miss Sophie

As I was about to take my photo she decided she wanted to get in on this blog post. Today, my sister is having a small dinner party/get together. I'm really looking forward to it, seeing as sometimes during the holidays its hard to get together with friends, have a meal, and just enjoy one anothers company.

To step back for a minute and enjoy this time together, the most wonderful time of the year. Holiday season is one of my favorites. Since this get together is just low key, I decided to stay casual myself.


Today I am in head to toe, Lucky Brand. My jeans I'm wearing today are one of my favorite skinnies that I own. They are so comfortable, the wash is dark enough that I can dress it up and dress it down, they are made in NC, USA and they have just enough stretch in them to do daily activities and be comfortable but they feel more like a raw denim. With 99% cotton and 1% spandex, they are the best jeans. My shirt, is older Lucky...I can't find a link for it, but in the meantime this shirt is a great subtitute! Heck, I may even get it, with it being the same shape as this shirt and the color it can go with more in my wardrobe. Simple classic colors are great to build a closet. 


I LOVE VERA! Seriously, there isn't a print that I don't like. Obsessed. So when I found out they have pet collars, you better believe I grabbed one in my favorite print, Ellie Blue. Sophie has been wearing it for about a month now and seems to love it. She is a very active dog, loves to play, loves to go outside. She is a dog that digs, so the fact that I can throw it in the washer like you can with any Vera Bradley fabric product was an added bonus. Right now there are only two prints available, they go fast!

Wednesday, November 20, 2013

A Fall Fail


With DIY there is always the good, the bad and the inbetween. Some projects turn out better than you think, some don't work at all. It happens. It's DIY.
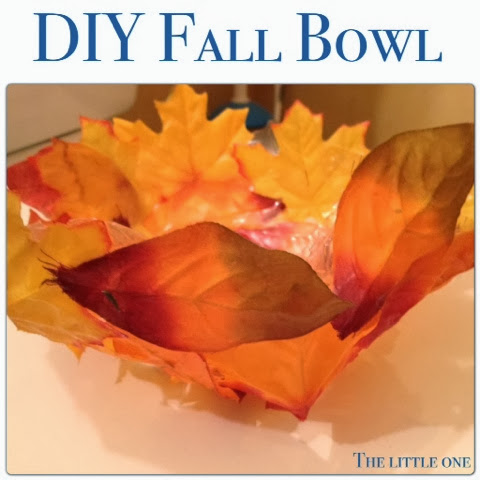
I guess it's not a total fail, since it is a bowl and that's what I intended on making. This bowl however, didn't work the way I wanted and I'm not sure where I can use it now in my home or what I can put in it. I'm not really proud of it, but I wanted to share. Maybe one of you will be able to guide me in a direction where I can't see yet, I still have some supplies left so I can re make it.

Enough negativity for one post! Let's get to the making of it...
 The supplies I used: mod Podge, a craft brush, one balloon, left over garland leaves from past projects
I had all these supplies on hand, but if you needed to go to the craft store to pick up the supplies it would run you around $15.

With scissors I just took my leaf garland strand and cut it apart. I apologize for not having taken a picture during that step. But then with each piece of leaf that came off the garland strand I just pulled apart the steam from the fabric.
Some were harder than others so the scissors would make an appearance here and there. After that, I just collected all the loose leaves in one area before I started my next step.
Introducing the mod Podge and craft brush! This is where the project got frustrating. The mod Podge wasn't working how I wanted. But, I'm getting ahead of myself.
I blew up a balloon and put one layer of mod Podge on the top of the balloon and then placed the leaves on top of the balloon that was now glued.
There was no exact placement or science for this part. Just cover the balloon with glue, place and then paint mod Podge over the leaves. That part was the hardest part. Some of the leaves just weren't sticking or as much as I put mod Podge on top of the leaves, they would move. 
After about thirty minutes of podging and placing I called it done. I wasn't really loving it but I thought maybe it will be better then I think. I should have listened to my gut instinct. I just took a kitchen cup and placed my balloon in it as a stand. Left it to dry for about four hours and then popped the balloon.

I wish I got my sister and I popping the balloon on video. Seriously. I'm still cry laughing. My sister popped hers first, and right away we just burst out laughing. The balloon slowly caved into itself and took all the leaves with it. We were so worried it wouldn't be like a bowl. But then we just had to recover the balloon and form it ourselves.

Then we got this....
Maybe mod Podge wasn't the right medium? I really want to try it again. I liked the idea of it. What do you think? A little weird right? Oh the joys of DIY crafts some days...


Monday, November 11, 2013

Canvas Memories

Keeping with creating crafts for free, I was able to preserve a memory from my recent Disney vacation using only supplies I had on hand.

The subjects? Mod Podge. A 3"x5" canvas. Grey paint. A paint brush. Photo printed out on computer paper. 

With that is as able to make this...
I have used Mod Podge in numerous projects in the past. But something about this one made my anxiety level go up just little. You see, I'm very attached to this photo. In October my sister, Jackie, and I went to Walt Disney World for my belated birthday gift. We saw Wishes, the nighttime firework show at Magic Kindgom twice out of the five days we were there. 

Wishes is at the top of my must see at Disney list. If you have been, you will understand. There is just something so magical about it. If you haven't had the chance, please promise me you will one day. 

Standing there in front of the castle and watching this show, your whole world stops. You just watch this magical firework show, you sing along with the songs that are playing, and the best part? Everyone's doing it around you. You're all watching in awe. You're all part of something for that 20 minutes each night it plays. 

So I wanted to preserve that.
I cut out my photo to size of my canvas. My picture was smaller than my canvas but I wanted to have a so called frame around it so I didn't mind. I just took grey acrylic folk art paint and painted about 3 cm on the front left and right, all the sides and top and bottom of the canvas. 
Then I took the Mod Podge and applied it to the front of the canvas. Then, I just placed the photo onto the painted glued area and pressed down. Making sure there were no bumps, creases and the photo was laying flush with the canvas and there was enough glue to hold it down. 
Once I put it down on the canvas, came the "please please do not ruin this photo" moment. Aka, the moment of truth. I took the mod Podge and lightly applied it to the top of the photo. Making sure to paint over the whole surface of the photo and the painted area of the canvas. While doing this, the Mod Podge wasn't transparent yet. So I was nervous it was going to look like I just put glue all over it. Because that's exactly what I did. After I applied all the glue, all the air pockets, bumps, lumps what have you all evened out. And a few hours later it dried.
It was ready to be hung on the wall and admired for many years. Just like I intended. So moral of the story, preserve that memory, were all nervous with sentimental things...but if you say nice things and believe in what you're doing you will love it, and that's all that matters.