Showing posts with label mod Podge. Show all posts

Wednesday, November 20, 2013

A Fall Fail


With DIY there is always the good, the bad and the inbetween. Some projects turn out better than you think, some don't work at all. It happens. It's DIY.
I guess it's not a total fail, since it is a bowl and that's what I intended on making. This bowl however, didn't work the way I wanted and I'm not sure where I can use it now in my home or what I can put in it. I'm not really proud of it, but I wanted to share. Maybe one of you will be able to guide me in a direction where I can't see yet, I still have some supplies left so I can re make it.

Enough negativity for one post! Let's get to the making of it...
 The supplies I used: mod Podge, a craft brush, one balloon, left over garland leaves from past projects
I had all these supplies on hand, but if you needed to go to the craft store to pick up the supplies it would run you around $15.

With scissors I just took my leaf garland strand and cut it apart. I apologize for not having taken a picture during that step. But then with each piece of leaf that came off the garland strand I just pulled apart the steam from the fabric.
Some were harder than others so the scissors would make an appearance here and there. After that, I just collected all the loose leaves in one area before I started my next step.
Introducing the mod Podge and craft brush! This is where the project got frustrating. The mod Podge wasn't working how I wanted. But, I'm getting ahead of myself.
I blew up a balloon and put one layer of mod Podge on the top of the balloon and then placed the leaves on top of the balloon that was now glued.
There was no exact placement or science for this part. Just cover the balloon with glue, place and then paint mod Podge over the leaves. That part was the hardest part. Some of the leaves just weren't sticking or as much as I put mod Podge on top of the leaves, they would move. 
After about thirty minutes of podging and placing I called it done. I wasn't really loving it but I thought maybe it will be better then I think. I should have listened to my gut instinct. I just took a kitchen cup and placed my balloon in it as a stand. Left it to dry for about four hours and then popped the balloon.

I wish I got my sister and I popping the balloon on video. Seriously. I'm still cry laughing. My sister popped hers first, and right away we just burst out laughing. The balloon slowly caved into itself and took all the leaves with it. We were so worried it wouldn't be like a bowl. But then we just had to recover the balloon and form it ourselves.

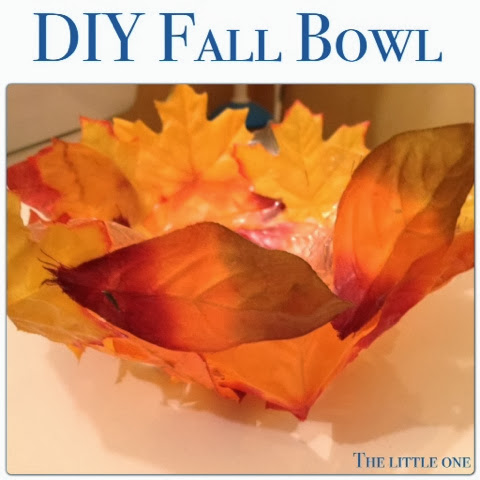
Then we got this....
Maybe mod Podge wasn't the right medium? I really want to try it again. I liked the idea of it. What do you think? A little weird right? Oh the joys of DIY crafts some days...


Monday, November 11, 2013

Canvas Memories

Keeping with creating crafts for free, I was able to preserve a memory from my recent Disney vacation using only supplies I had on hand.

The subjects? Mod Podge. A 3"x5" canvas. Grey paint. A paint brush. Photo printed out on computer paper. 

With that is as able to make this...
I have used Mod Podge in numerous projects in the past. But something about this one made my anxiety level go up just little. You see, I'm very attached to this photo. In October my sister, Jackie, and I went to Walt Disney World for my belated birthday gift. We saw Wishes, the nighttime firework show at Magic Kindgom twice out of the five days we were there. 

Wishes is at the top of my must see at Disney list. If you have been, you will understand. There is just something so magical about it. If you haven't had the chance, please promise me you will one day. 

Standing there in front of the castle and watching this show, your whole world stops. You just watch this magical firework show, you sing along with the songs that are playing, and the best part? Everyone's doing it around you. You're all watching in awe. You're all part of something for that 20 minutes each night it plays. 

So I wanted to preserve that.
I cut out my photo to size of my canvas. My picture was smaller than my canvas but I wanted to have a so called frame around it so I didn't mind. I just took grey acrylic folk art paint and painted about 3 cm on the front left and right, all the sides and top and bottom of the canvas. 
Then I took the Mod Podge and applied it to the front of the canvas. Then, I just placed the photo onto the painted glued area and pressed down. Making sure there were no bumps, creases and the photo was laying flush with the canvas and there was enough glue to hold it down. 
Once I put it down on the canvas, came the "please please do not ruin this photo" moment. Aka, the moment of truth. I took the mod Podge and lightly applied it to the top of the photo. Making sure to paint over the whole surface of the photo and the painted area of the canvas. While doing this, the Mod Podge wasn't transparent yet. So I was nervous it was going to look like I just put glue all over it. Because that's exactly what I did. After I applied all the glue, all the air pockets, bumps, lumps what have you all evened out. And a few hours later it dried.
It was ready to be hung on the wall and admired for many years. Just like I intended. So moral of the story, preserve that memory, were all nervous with sentimental things...but if you say nice things and believe in what you're doing you will love it, and that's all that matters.