Thursday, November 28, 2013

From my family to yours

A happy thanksgiving! From my family to yours. 

Today is a day about family, about being together with the ones you love. 

I am thankful for many things and count my blessings daily. Just wanted to stop by and spread the thankful cheer!!

Now go out and eat some turkey, enjoy the food and your family. 

Wednesday, November 27, 2013

There's A First For Everything

I've mentioned many times now how my family is holding Thanksgiving at my home this year. To say I am excited doesn't even begin to describe it. I love hosting, baking, and having family all together in one place. I'm still getting use to cooking. I prefer to bake.

So bake I did. I have already made a pumpkin pie and Oreo Truffles for Thursday (Thanksgiving) but today I decided to make a pie I never have before. An Apple Pie. An American classic. My favorite personally is the pumpkin pie but apple pie is good too, good enough to know I couldn't screw this one up.
I started with the main act, the granny smith green apple. A personal favorite of mine for snacking, but she does very well in pie making. I needed 6 apples, washed, peeled and cut. This took the most of the time, next to actually making the dough of course.

As much as I would love to share with you my recipe, I think my Grandma may or may not be a little angered by that action, you see this is a family recipe. Until now, others have attempted the apple pie making...until I said "No, I'm pretty confident now in my baking skills, I've been making for awhile, I'll do it". Pressure added the second I opened my mouth. I can make a pumpkin pie in my sleep, apple on the other hand, not so much.

So here is a recipe I found on the internet, everyone makes apple pie differently, but this is one of the better recipes, courtesy of Pillsbury:
________________________________________________________


Ingredients

Crust
box Pillsbury® refrigerated pie crusts, softened as directed on box

Filling*
cups thinly sliced, peeled apples (6 medium)
¾ cup sugar
tablespoons all-purpose flour
¾ teaspoon ground cinnamon
¼ teaspoon salt
 teaspoon ground nutmeg
tablespoon lemon juice

Steps
1Heat oven to 425°F. Place 1 pie crust in ungreased 9-inch glass pie plate. Press firmly against side and bottom.2In large bowl, gently mix filling ingredients; spoon into crust-lined pie plate. Top with second crust. Wrap excess top crust under bottom crust edge, pressing edges together to seal; flute. Cut slits or shapes in several places in top crust.3Bake 40 to 45 minutes or until apples are tender and crust is golden brown. Cover edge of crust with 2- to 3-inch wide strips of foil after first 15 to 20 minutes of baking to prevent excessive browning. Cool on cooling rack at least 2 hours before serving. _________________________________________________________

Here is how mine turned out after two silent prays, one putting it in the oven and one taking it out and letting it cool. I would say it turned out pretty good. Enjoy!!


Wardrobe Wednesday!

For you that follow me on Instagram, you may or may not have seen this sneak peek I shared earlier:


Thermals are a staple winter item for me. The days of the plain white long john looking thermals are over, and over the last 2-3 years thermals have started to show up to the party with a new makeover. Let me tell you why I love thermals so much. I'm a girl who is all about looking cute and stylish but 8 out of 10 times I will chose comfort over being stylish. 

Thermals are just that. They are very comfortable. I can easily thrown them on roll the sleeves a little to style them, pair them with a necklace or scarf or nothing if the thermal speaks for itself. Layering pieces in winter are essential. Especially for where I live. If you think that long sleeve T-shirt from the Gap will get through the whole day and you will be warm enough, I will not lend you my cardigan or scarf. You have been warned. But continue to wear the T-shirt, Gap is great for simple pieces. 

This thermal is one of my favorites, why? Because it has studs for buttons! I mean, how cool is that? Now i'll be honest, I never got into the stud trend but this subtle amount of studs works for me. 


My mom snapped this photo of me, we have family coming in today from out of state to stay with us for thanksgiving, thanksgiving is at my house tomorrow which means the camera is out at all times...so smile! Or be on your phone. But when she showed me the picture I just had to use it for wardrobe wednesday!

My jeans I have on today are actually jeggings. I may look socially acceptable to leave my house but I feel like I have a pair of the baggiest most comfortable pair of my boyfriends sweatpants on, but I don't at all. I have jeggings on. What's even better is they slip right into my boots with no fuss.

Those boots? I don't think I have expressed my love for Uggs. I have mentioned wearing them before but I. Love. UGGS. Warm, comfortable, slipper like, and I don't care what anyone says I think they're cute. Which matters because they are on my feet and I'm the one who has to be wearing them. I have gotten through 5 of our winters here with one pair of uggs and they didn't get harmed. I swear by this brand of footwear. 

So when I found out they make other types of footwear, I pounced. Literally, I pounced on this boot box when I saw it at Lord & Taylor. I asked for them last year for christmas and I was so glad to see them on christmas morning. You see, they look just like a normal black riding boot. But there not! They are sherpa lined on the inside and they have buckles and grommets on the outside to make them look dressy while the insides of your shoes are singing hallelujah and thanking you for keeping your toesies warm. 

What about you, do you have a favorite footwear brand that you swear by? Do you also live in a cold area with harsh winters and have understood the idea of layering? Any trends that you make work for your lifestyle? I would love to hear in the comment section below!

And Happy Early Thanksgiving!

Sunday, November 24, 2013

Oreo Truffle Recipe

Oreo cookie. Cheesecake. Chocolate.

Aren't those the three best things you've ever heard? Okay, actually I could think of thousands of other things that would sound equally as good but let's pretend for a few minutes those are THE BEST. 

When I found out I could combine my three favorite ingredients together and have it made under an hour, I said sign me up. Honestly, I said that out loud.
I'm aware my photo above isn't the best, it's not very "pin" worthy but I was working on short time and you know what? These things will be gone before anyone at thanksgiving can even say, pin. I stumbled upon this recipe while cruising around on Pinterest one day, and like many things pinned it and never made it. That is until I had this feeling the name seemed fancier than the process. I was right. I'm so glad I was right. 
You will need a package of Oreos, one package of cream cheese, two packs of chocolate chips (I used chocolate and white chocolate) a rolling pin, toothpicks, cooling rack and aluminum foil.

The only thing I had to go to the store for was toothpicks. I'm telling you Oreos, chocolate and cream cheese are my thing, I don't know why I didn't think of this sooner.
I also grabbed three sandwich bags to put my separated Oreo cookies in. How you eat an Oreo is very important, everyone eats them differently. I eat them by twisting the cookie from the cream and eating the cream first then eating the cookie. This is the right way, okay? Okay. 

So that's what I did for this, I just twisted and separated. I used a butter knife to scrape off the cream from the cookie, and I put the insides into a small mixing bowl. The cookies went into the sandwich bags.
I should get an award for not eating any of the cookies as I did this. It was a struggle, boy oh boy was it a struggle but I did it!

Then I took my rolling pin and pounded, rolled and just crushed the cookies until they were finely crushed. I figured out by bag two that you should probably flip the bag every so often because not all the cookies are reaching the surface. So roll, pound, crush, flip. Easy, right?
Then, I pulled out my hand mixer. In a big mixing bowl add the insides of the cookie that you separated, and the cream cheese. Just blend it together until it's all the same consistency. 
Add your cookie crumbles to the cream mixture. Now this part is important. Do not, do not put your mixer on anything higher than 1. You will get cookie everywhere and have to stop because you are panicly picking up the small pieces of chocolate that are now on your kitchen floor so your dog doesn't eat them. But I'm just talking hypothetically, right? I wish. Level 1 my friends. Level 1. 
Once everything is mixed together and all the chocolate is off your kitchen floor, haha, just roll the mixture into small balls about 1" in size.

Get your cooling rack or cookie sheet ready, have it covered with either wax paper or foil. I had foil on hand so I used what I had. Place the cookie truffles onto the sheet. 

This is another important part. Put the toothpicks in your truffles and place them in your refrigerator for about an hour, or until they are firm enough to be dipped in chocolate. I did 35 minutes and it seemed to work. 

Then put the chocolate chips into a bowl and melt it. You can use the stovetop method but I did the microwave and you can't tell the difference. I promise you and it cuts down a lot of time. Microwave it for one minute stir so the chips are evenly melting then put it back in for 10 seconds if it's not melting fully.

Then just dip your truffles into the chocolate. I tried designs at first then I decided I'll leave that part to the pro's because I did better at just dipping them. 

Make sure once you are done dipping them, remove the toothpick.
Some look better than others, but they are all homemade with love and that's all that matters. 

I may have not eaten a cookie but I did sneak one of the finished products. I had to test it out, am I right?! It was AMAZEBALLS. Pun intended. 

Here's the recipe:

36 Oreo cookies, finely crushed, divided
1 package cream cheese, softened
2 packages chocolate chips, semi sweet

Mix cream cheese and cookie crumbs until well blended. Shape into 1" balls. Dip in melted chocolate and place on wax paper covered cookie sheet. Refrigerate 1 hour or until firm. Serve.

Wednesday, November 20, 2013

A Fall Fail


With DIY there is always the good, the bad and the inbetween. Some projects turn out better than you think, some don't work at all. It happens. It's DIY.
I guess it's not a total fail, since it is a bowl and that's what I intended on making. This bowl however, didn't work the way I wanted and I'm not sure where I can use it now in my home or what I can put in it. I'm not really proud of it, but I wanted to share. Maybe one of you will be able to guide me in a direction where I can't see yet, I still have some supplies left so I can re make it.

Enough negativity for one post! Let's get to the making of it...
 The supplies I used: mod Podge, a craft brush, one balloon, left over garland leaves from past projects
I had all these supplies on hand, but if you needed to go to the craft store to pick up the supplies it would run you around $15.

With scissors I just took my leaf garland strand and cut it apart. I apologize for not having taken a picture during that step. But then with each piece of leaf that came off the garland strand I just pulled apart the steam from the fabric.
Some were harder than others so the scissors would make an appearance here and there. After that, I just collected all the loose leaves in one area before I started my next step.
Introducing the mod Podge and craft brush! This is where the project got frustrating. The mod Podge wasn't working how I wanted. But, I'm getting ahead of myself.
I blew up a balloon and put one layer of mod Podge on the top of the balloon and then placed the leaves on top of the balloon that was now glued.
There was no exact placement or science for this part. Just cover the balloon with glue, place and then paint mod Podge over the leaves. That part was the hardest part. Some of the leaves just weren't sticking or as much as I put mod Podge on top of the leaves, they would move. 
After about thirty minutes of podging and placing I called it done. I wasn't really loving it but I thought maybe it will be better then I think. I should have listened to my gut instinct. I just took a kitchen cup and placed my balloon in it as a stand. Left it to dry for about four hours and then popped the balloon.

I wish I got my sister and I popping the balloon on video. Seriously. I'm still cry laughing. My sister popped hers first, and right away we just burst out laughing. The balloon slowly caved into itself and took all the leaves with it. We were so worried it wouldn't be like a bowl. But then we just had to recover the balloon and form it ourselves.

Then we got this....
Maybe mod Podge wasn't the right medium? I really want to try it again. I liked the idea of it. What do you think? A little weird right? Oh the joys of DIY crafts some days...


It's Wednesday!

Which means it's wardrobe wednesday!

I'm really starting to love this weekly blog feature. I really enjoy sharing and telling stories. Throw in talking about style or entertainment and I'm there. I'll even bring the snacks. Snacks are always good.

It's a pretty cold one today at home, normal for this time but my outfit doesn't say "It's 40 degrees outside"more like "It's spring outside".  I love a good chunky sweater and warm accessories but I can't believe I'm about to say this, but I'm just not ready for the cold weather yet. I love snow. But right now I'm loving this outfit a bit more. It's easy, it's fun and more importantly its comfortable. I'm all for comfort.

On days that I don't want to wear "real" pants, I look to my leggings. Because going out in public with no pants is a girl I am not. Although most of the stars now are pushing the envelope. Ah who am I kidding, never would I ever. I need pants. No one wants to see that, lets be honest. 

That Polka Dot Top that is trying to peek through is one of the softest and most comfortable tee's that I own. I should have boughten two. 

Everyone should own one really good chambray shirt. I own two, one is a lighter denim (shown in this post) and a darker denim. I never use to understand why people would want to wear denim on denim. I truly didn't. It took me a few years to get comfortable with it, but in my own way. 

That's what everyone needs to think when it comes to trends. Don't try to be exactly like the mannequin in the store or the model in the magazine. Find a trend that you like and alter it to work for you. So when it comes to denim on denim I usually will do a lighter denim on top, and a darker or black denim on bottom. Today I opted out of denim on the bottom, said suit up, to my leggings and placed my denim on top. 

What about you? Do you have a trend that you have altered and learned to love? Do you love to dress comfortable but still look semi presentable? I'd love to hear in the comments below. 

Friday, November 15, 2013

How do you say?

I believe in coincidence.

This one happened to be a really cool one.

Have you ever wondered if where you reside has influenced your speech? I do, all the time. I actually was talking to a coworker yesterday about how everyone has accents and usually they don't know. Think about it, we all are aware of some accents because of TV shows and movies but we never realize some of those accents are actually our own.

Until this really fun quiz came about.

I actually stumbled upon it when I was reading a post from my favorite blog, Young House Love. It's a quiz entitled What American Accent Do You Have?

Isn't that kind of funny that I was just having a conversation about this and then this quiz came to another bloggers attention. Such a small world.

I'm a sucker for taking polls and quizzes online, and laughing at the results. But not this time. When I took this quiz it was right on point. It was so freaky I took it twice. I got the same result both times. I just couldn't believe it...
I have gotten into many discussions over whether the beverage is called "pop" or "soda". I say "pop". It's pop people. Soda just sounds weird coming out of my mouth. Weird that this quiz didn't know that about me and yet it said it. 

Living very close to Lake Erie and a short drive away from Lake Ontario having this quiz give me the result of 100% The Inland North is pretty cool. I have gone on many vacations where people have asked me where I was from. Living in the same town I have since birth I know that people in this area are very hard on their vowels when we speak, and when we travel it's the first thing people notice when we speak.  

But this quiz, oh man, was it hilarious to take. First of all, I was taking it in my living room while my Mom was sitting in the same room. She had no idea what I was doing at first, I just started saying random words over and over again. Until I filled her in, then the two of us were filling out the questions. 

This question was by far the funniest. The two of us were going back and fourth, out loud, saying "ou" "ou" "ab-ou-t" "l-ou-ou-d" deciding what answer to choose. Some days I wish we had a camera crew. 

The quiz took no more than 5 minutes. It was the best 5 minute spent. Take it, laugh and see what you get! And share in the comments below, I'd love to know what everyone gets!!


Wednesday, November 13, 2013

Wa Wa Wardrobe Wednesday!

Do you ever feel like there is just not enough time in one day?

I do.

With the semester coming to a close ( I have 3 wks left) and final projects being handed out, I feel like with each day I lose more time. Today has been a crazy day. With helping around the house before family arrives for the holidays, fitting in a quick tutor session before classes, and getting ready to see Malcom Gladwell, I'm surprised I threw together this look.

Sometimes it's the looks that are quickly put together, not overthought or over styled are the looks you love. I'm the girl that will rip apart her closet, try on  five outfits and end up going with the first outfit, run out of the house and leave my room in shambles. Today, I left with the first outfit I had on and went about my day.

Mark the calendars. Seriously, do you need me to lend you a pen for this moment?
I apologize for the blurred photo. No time to edit! 

Here is what I'm wearing:
Denim: Seven For All Mankind
Sweater: American Eagle
Scarf: Lucky Brand, I apologize I got this spring of last year and couldn't find a substitute! 
Riding Boots:Lucky Brand, I got mine 2 years ago and since then the company has stopped selling my exact pair, but apparently this website sells them so enjoy! And enjoy the price point as well!

Monday, November 11, 2013

Canvas Memories

Keeping with creating crafts for free, I was able to preserve a memory from my recent Disney vacation using only supplies I had on hand.

The subjects? Mod Podge. A 3"x5" canvas. Grey paint. A paint brush. Photo printed out on computer paper. 

With that is as able to make this...
I have used Mod Podge in numerous projects in the past. But something about this one made my anxiety level go up just little. You see, I'm very attached to this photo. In October my sister, Jackie, and I went to Walt Disney World for my belated birthday gift. We saw Wishes, the nighttime firework show at Magic Kindgom twice out of the five days we were there. 

Wishes is at the top of my must see at Disney list. If you have been, you will understand. There is just something so magical about it. If you haven't had the chance, please promise me you will one day. 

Standing there in front of the castle and watching this show, your whole world stops. You just watch this magical firework show, you sing along with the songs that are playing, and the best part? Everyone's doing it around you. You're all watching in awe. You're all part of something for that 20 minutes each night it plays. 

So I wanted to preserve that.
I cut out my photo to size of my canvas. My picture was smaller than my canvas but I wanted to have a so called frame around it so I didn't mind. I just took grey acrylic folk art paint and painted about 3 cm on the front left and right, all the sides and top and bottom of the canvas. 
Then I took the Mod Podge and applied it to the front of the canvas. Then, I just placed the photo onto the painted glued area and pressed down. Making sure there were no bumps, creases and the photo was laying flush with the canvas and there was enough glue to hold it down. 
Once I put it down on the canvas, came the "please please do not ruin this photo" moment. Aka, the moment of truth. I took the mod Podge and lightly applied it to the top of the photo. Making sure to paint over the whole surface of the photo and the painted area of the canvas. While doing this, the Mod Podge wasn't transparent yet. So I was nervous it was going to look like I just put glue all over it. Because that's exactly what I did. After I applied all the glue, all the air pockets, bumps, lumps what have you all evened out. And a few hours later it dried.
It was ready to be hung on the wall and admired for many years. Just like I intended. So moral of the story, preserve that memory, were all nervous with sentimental things...but if you say nice things and believe in what you're doing you will love it, and that's all that matters. 


It's the Free Things in Life

That make us happy. And Ryan Renolds of course.

Crushes aside I think I got bit by the craft bug. Don't be alarmed, it's not like the Spider-Man bug where I turn into this really cool superhero. Although, being a crafter I would like to think I have a super power with anything I can find in Michaels, Joann's and Hobby Lobby. 

Over the weekend I did some crafting. Nothing heavy nothing too creative. More like a "I should really get to that" kind of craft. All of these crafts were FREE! That's right. I hoard craft supplies. You never know when you may need them. Or get the energy to want to craft. 

What I love most about free crafts is I have nothing invested in them so if they don't turn out, I didn't waste a dime or a recent coupon. Mainly the coupon. 

I do not have a green thumb. I invested an aloe plant over the summer from work. When the new floor set called for discarding the aloe plants I said I would take them home with me. Forgetting that every plant I ever have, dies. After many months of talking sweet nothings and watering the aloe plant every week it sadly died. I will never be a good gardener and I'm okay with it. Because I got a free clay pot put of it.

I just went into my craft room and pulled out some supplies to take this clay pot from ordinary to Extrordinary. Okay I may be starting to talk sweet nothings to this clay pot now. I wanted to stay in the neutral color family with hints of blue. I used puff paint to add texture onto the clay pot first before painting over it.
I really wanted the polka dots on the rim of the clay pot. And then I just started drawing this swooshy pattern. I had no result in mind. Which is very unlike me when I craft. I blame the free-ness. Like I said, I was going all in. 
I chose to paint my clay pot Snow White. If I didn't like the white, I thought this is such a small aspect of this planter that if it doesn't work out it wasn't a lot of time wasted. But I loved how crisp the white paint made it look. So I pushed on. 
Let me tell you one thing, painting clay is no joke. This babe took about two hours just to paint white. It took about 4+ coats of acrylic craft paint. I'm sure there is something else in the market to paint clay planters more efficiently with but I had this paint on hand already. I just put on a movie and painted away. The paint absorbed into the clay quickly and dried quickly. I wasn't going for non visible brushstrokes. I wanted it to look rustic loved and homemade. 
Once it was covered in white paint I chose to use my light blue as an accent color. I wasn't perfect with my brushstrokes here either. I was going for playful and handmade. The only real color I wanted on this planter was the light blue. I want this planter to be able to live anywhere and not have to worry about it standing out. 
I decided flipping over the planter would be the best action to complete the next step. I took pearl by Martha Stewart and painted thicker vertical stripes from the bottom of the blue stripe to the bottom of the planter. Then I started to add accent stripes of silver and black, making sure they were more delicate then the pearl and blue stripes. 
Originally when I flipped the planter back over to stand correctly, the stripes and the blue stripe made me think of a cucpcake. So I decided to paint more delicate horizontal stripes in the silver and black so it looked less like a bake good and more like something you would put a plant in. 
Overall, I'm proud of the the little planter that could. I still need a plant for it. And a permanent home in my home. But, I have grown to love this "if it doesn't work, it doesn't work" project planter. 

While this project was free for myself, getting the supplies to complete this project would not be over $15. 

How about you guys? Are you crafting lately? Isn't it the best feeling to do something completely free and not have any ties? 


Wednesday, November 6, 2013

WW!

Wardrobe Wednesday is here!

Today I just decided to go for comfort and ease. I rarely wear these AE Vintage Flare jeans and every time I wear them I always find myself saying "man, I gotta wear these more often". They are so comfortable and they are the only flare that fits my petite frame. I also love the mid wash range of the denim and the subtle hints of the distressing and paint splatters. 
When I saw this shirt at Urban Outfitters I may or may not have squealed with excitement. Anything that has a westie on it I will buy it. I have soap in my bathroom that is in the shape of my Sophie, do not challenge me with that. I love her so why wouldn't I buy a shirt with her on it?!
Oh the arm party. I love a good grouping of bracelets with different textures and colors. Since today was all about ease, so was my jewelry. Although I did step it up a bit from usual. Usually I will just wear my ring that my mother gave me and my leather personalized braided bracelet that I got in Disney in 2012. Finding my name on things is a full time job, you think I'm kidding...try it. I will never have my name on a souvenir without having to ask if they do personalization, I'm over it, I'm use to it now. 

I just added my wrap bracelet and my new favorite Alex and Ani exclusive Walt Disney World charm bangle that you can only get in the disney parks. I don't wear it often because I love it so much and I'm so nervous to ruin it or have it catch on something while I'm at work or doing something where it could be in harms way. I got it recently when I went with my sister in October so it's a nice reminder of our trip together as well when I look at it. 


Wreath tutorial

This year, we are holding Thanksgiving at my home. As a college kid who commutes to school daily, I still live at home, so when my Mom found out, I was the chosen child to help plan for everyone coming over. I was probably more excited than any kid my age would be.

I quickly jumped on Pinterest and started researching side dishes, desserts, crafts, anything thanksgiving themed.

Once we got the menu down and how we wanted the layout for the dinner (we have a small ranch home, 2 bedrooms 1 bath) I opened my mouth with excitement once again and said I would do the decorating too.

I decided to make this wreath. I had no directions at all, I just winged it, and I'm so proud of it. Here is the full tutorial (with pictures for us visual folks!) so you can make this for your home:

This is what you will need to complete the first portion of this wreath...I went to Michaels and filled my cart, I didn't even know Michaels had carts but I'm so grateful they did.
I just chose a fall color scheme with hints of red. I really wanted to create something that could live on the front door for all of fall. Next year I will be able to bring it out sooner. This next part took me about an hour and half to complete. I just put on a movie and started...
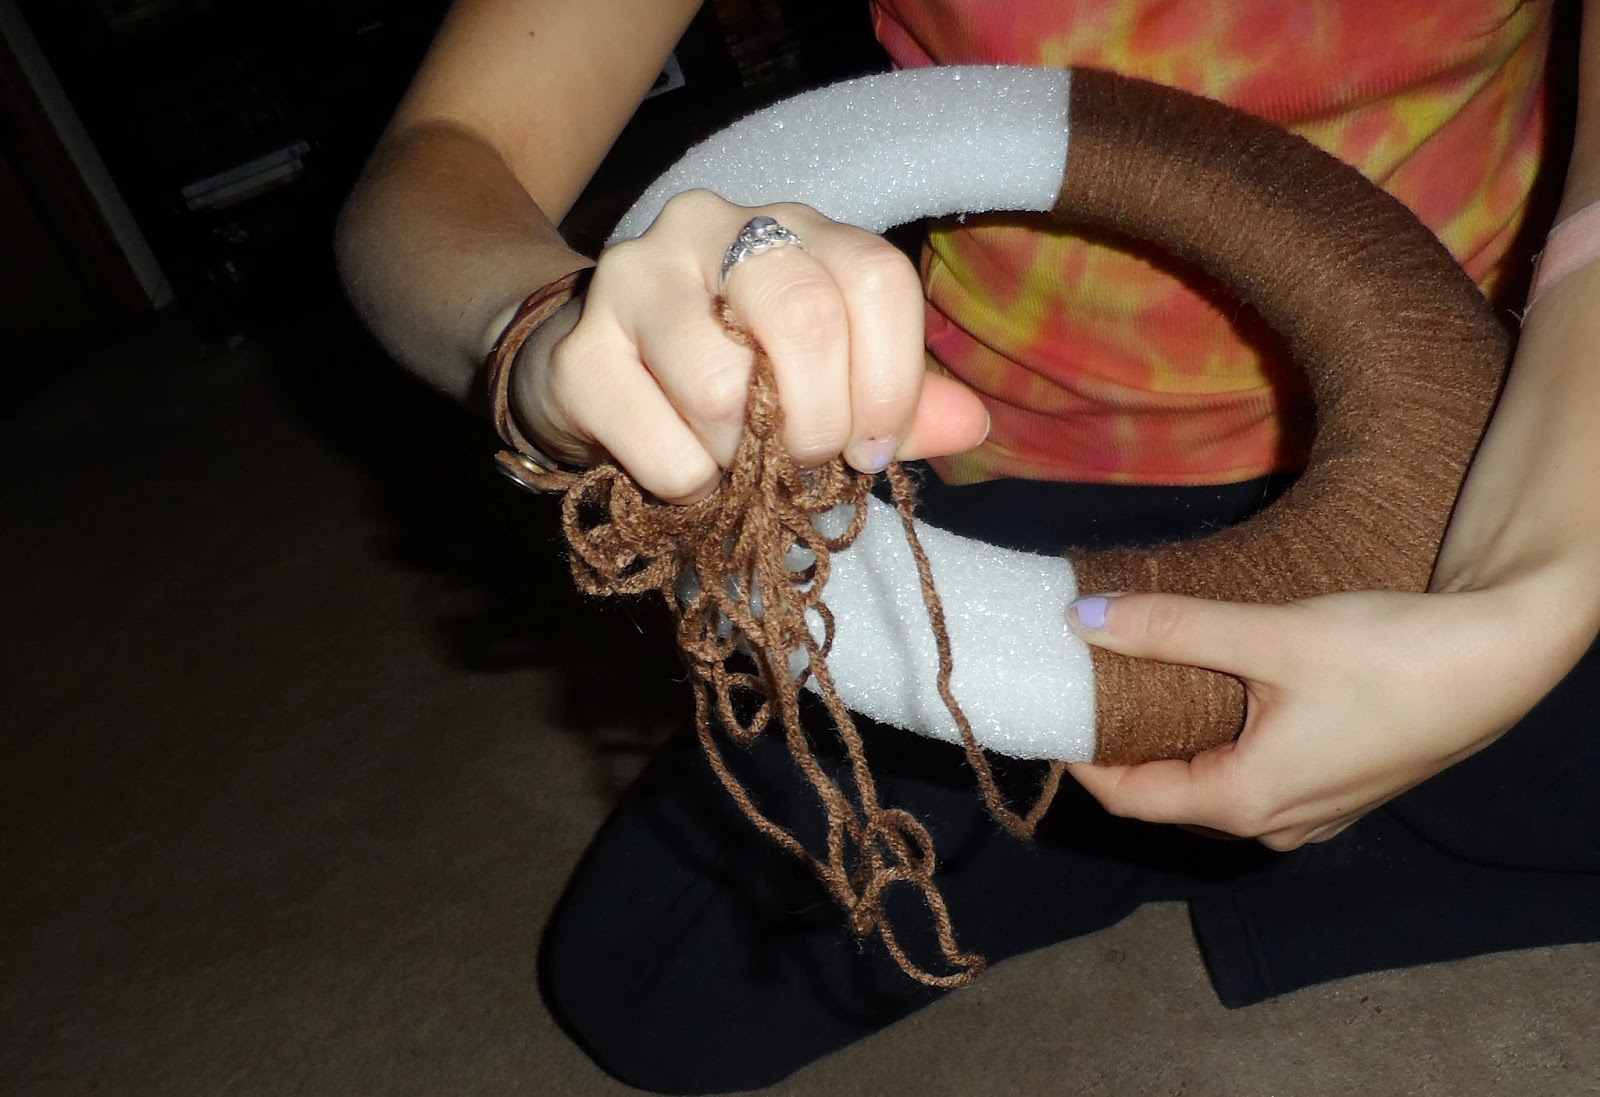
I chose to wrap the Styrofoam wreath with the brown yarn and introduce the red yarn later on. With my thumb I held down the previous wrapped area and with my right hand I took the yarn and just wrapped it around, I tried to make sure the tension was the same all the way through. 
I found it easier to cut a small portion of the yarn ball it up in my right hand and wrap that way. At first trying to get all the yarn through the wreath was tough. Once I figured that out I was flying along. That is until my yarn ball ran out...
Then I just cut more yarn ( I just pulled from the original yarn ball, usually counted to a double digit number as I pulled to guarantee I had enough slack) and took the old end and tied it to the new end. I then camoflauged the knots when I wrapped around that area. The styrofoam helped a bit and grabbed the fibers from the yarn so I didn't have to worry about it sticking out. 
An hour and a half later I flipped it over and had a perfectly yarn wrapped wreath. At this point it was midnight so I decided as much as I loved my new wreath sleep was much more important. Quick tip: When deciding between sleep and a wreath, always choose sleep. Sleep is always good. The wreath will be there in the morning.

So the next morning I took out my round two of supplies
You probably wouldn't need the cutting board but I was sitting on my living room floor, so the cutting board was needed. I decided to just use some left over card stock to use as a template and see if the size I cut out would fit my wreath. I was going for an argyle pattern, so squares was the name of the game. 
2" x 2.5" worked out well for the vision I had... with that I introduce the felt
I then layered all the felt together, took my template and figured I would need about 12 squares, so 4 per piece of felt. I drew on the top piece of felt and just cut the squares out.
I had 12 total squares now...then I took out my wreath and placed the squares around the wreath making sure no like colors were next to one another, that is until I got to the end and realized I needed an open space for my leaves and decorations
I then took my hot glue gun and started to glue down my felt pieces making sure to get enough glue to keep it secure over the long haul

Then just pat down your squares to make sure they stick as you go

The next thing I did was bring out my red yarn and started to pull it out and cut a small amount of yarn since I only needed it to go around twice
On the back side I just tied it and glued the red yarn to the brown yarn so it would stay, and made sure as I went the tension was the same.
Once I finished going around the one way, I started the other way and made sure the red yarn crossed over each other to make an "X" over the pieces of felt...
This is what it looked like when I was all done with my yarn wrapping
It's really pretty as is and if you wanted you could just stop there, but I knew what I wanted to complete it would make this already pretty looking wreath look gorgeous. 
I just ripped apart some fall garland I purchased, taking one berry cluster and some leaves from one and some flowers from a fall bouquet. With that I just stuck them into the wreath 
I made sure to hot glue the leaves and flowers to the wreath to secure them down 
then I added the finishing touch, the berry cluster and then hung it on my front door. Doesn't it just say "Happy Thanksgiving!" to you? No, just me then? Oh well I love it...