Monday, November 11, 2013

Canvas Memories

Keeping with creating crafts for free, I was able to preserve a memory from my recent Disney vacation using only supplies I had on hand.

The subjects? Mod Podge. A 3"x5" canvas. Grey paint. A paint brush. Photo printed out on computer paper. 

With that is as able to make this...
I have used Mod Podge in numerous projects in the past. But something about this one made my anxiety level go up just little. You see, I'm very attached to this photo. In October my sister, Jackie, and I went to Walt Disney World for my belated birthday gift. We saw Wishes, the nighttime firework show at Magic Kindgom twice out of the five days we were there. 

Wishes is at the top of my must see at Disney list. If you have been, you will understand. There is just something so magical about it. If you haven't had the chance, please promise me you will one day. 

Standing there in front of the castle and watching this show, your whole world stops. You just watch this magical firework show, you sing along with the songs that are playing, and the best part? Everyone's doing it around you. You're all watching in awe. You're all part of something for that 20 minutes each night it plays. 

So I wanted to preserve that.
I cut out my photo to size of my canvas. My picture was smaller than my canvas but I wanted to have a so called frame around it so I didn't mind. I just took grey acrylic folk art paint and painted about 3 cm on the front left and right, all the sides and top and bottom of the canvas. 
Then I took the Mod Podge and applied it to the front of the canvas. Then, I just placed the photo onto the painted glued area and pressed down. Making sure there were no bumps, creases and the photo was laying flush with the canvas and there was enough glue to hold it down. 
Once I put it down on the canvas, came the "please please do not ruin this photo" moment. Aka, the moment of truth. I took the mod Podge and lightly applied it to the top of the photo. Making sure to paint over the whole surface of the photo and the painted area of the canvas. While doing this, the Mod Podge wasn't transparent yet. So I was nervous it was going to look like I just put glue all over it. Because that's exactly what I did. After I applied all the glue, all the air pockets, bumps, lumps what have you all evened out. And a few hours later it dried.
It was ready to be hung on the wall and admired for many years. Just like I intended. So moral of the story, preserve that memory, were all nervous with sentimental things...but if you say nice things and believe in what you're doing you will love it, and that's all that matters. 


It's the Free Things in Life

That make us happy. And Ryan Renolds of course.

Crushes aside I think I got bit by the craft bug. Don't be alarmed, it's not like the Spider-Man bug where I turn into this really cool superhero. Although, being a crafter I would like to think I have a super power with anything I can find in Michaels, Joann's and Hobby Lobby. 

Over the weekend I did some crafting. Nothing heavy nothing too creative. More like a "I should really get to that" kind of craft. All of these crafts were FREE! That's right. I hoard craft supplies. You never know when you may need them. Or get the energy to want to craft. 

What I love most about free crafts is I have nothing invested in them so if they don't turn out, I didn't waste a dime or a recent coupon. Mainly the coupon. 

I do not have a green thumb. I invested an aloe plant over the summer from work. When the new floor set called for discarding the aloe plants I said I would take them home with me. Forgetting that every plant I ever have, dies. After many months of talking sweet nothings and watering the aloe plant every week it sadly died. I will never be a good gardener and I'm okay with it. Because I got a free clay pot put of it.

I just went into my craft room and pulled out some supplies to take this clay pot from ordinary to Extrordinary. Okay I may be starting to talk sweet nothings to this clay pot now. I wanted to stay in the neutral color family with hints of blue. I used puff paint to add texture onto the clay pot first before painting over it.
I really wanted the polka dots on the rim of the clay pot. And then I just started drawing this swooshy pattern. I had no result in mind. Which is very unlike me when I craft. I blame the free-ness. Like I said, I was going all in. 
I chose to paint my clay pot Snow White. If I didn't like the white, I thought this is such a small aspect of this planter that if it doesn't work out it wasn't a lot of time wasted. But I loved how crisp the white paint made it look. So I pushed on. 
Let me tell you one thing, painting clay is no joke. This babe took about two hours just to paint white. It took about 4+ coats of acrylic craft paint. I'm sure there is something else in the market to paint clay planters more efficiently with but I had this paint on hand already. I just put on a movie and painted away. The paint absorbed into the clay quickly and dried quickly. I wasn't going for non visible brushstrokes. I wanted it to look rustic loved and homemade. 
Once it was covered in white paint I chose to use my light blue as an accent color. I wasn't perfect with my brushstrokes here either. I was going for playful and handmade. The only real color I wanted on this planter was the light blue. I want this planter to be able to live anywhere and not have to worry about it standing out. 
I decided flipping over the planter would be the best action to complete the next step. I took pearl by Martha Stewart and painted thicker vertical stripes from the bottom of the blue stripe to the bottom of the planter. Then I started to add accent stripes of silver and black, making sure they were more delicate then the pearl and blue stripes. 
Originally when I flipped the planter back over to stand correctly, the stripes and the blue stripe made me think of a cucpcake. So I decided to paint more delicate horizontal stripes in the silver and black so it looked less like a bake good and more like something you would put a plant in. 
Overall, I'm proud of the the little planter that could. I still need a plant for it. And a permanent home in my home. But, I have grown to love this "if it doesn't work, it doesn't work" project planter. 

While this project was free for myself, getting the supplies to complete this project would not be over $15. 

How about you guys? Are you crafting lately? Isn't it the best feeling to do something completely free and not have any ties? 


Wednesday, November 6, 2013

WW!

Wardrobe Wednesday is here!

Today I just decided to go for comfort and ease. I rarely wear these AE Vintage Flare jeans and every time I wear them I always find myself saying "man, I gotta wear these more often". They are so comfortable and they are the only flare that fits my petite frame. I also love the mid wash range of the denim and the subtle hints of the distressing and paint splatters. 
When I saw this shirt at Urban Outfitters I may or may not have squealed with excitement. Anything that has a westie on it I will buy it. I have soap in my bathroom that is in the shape of my Sophie, do not challenge me with that. I love her so why wouldn't I buy a shirt with her on it?!
Oh the arm party. I love a good grouping of bracelets with different textures and colors. Since today was all about ease, so was my jewelry. Although I did step it up a bit from usual. Usually I will just wear my ring that my mother gave me and my leather personalized braided bracelet that I got in Disney in 2012. Finding my name on things is a full time job, you think I'm kidding...try it. I will never have my name on a souvenir without having to ask if they do personalization, I'm over it, I'm use to it now. 

I just added my wrap bracelet and my new favorite Alex and Ani exclusive Walt Disney World charm bangle that you can only get in the disney parks. I don't wear it often because I love it so much and I'm so nervous to ruin it or have it catch on something while I'm at work or doing something where it could be in harms way. I got it recently when I went with my sister in October so it's a nice reminder of our trip together as well when I look at it. 


Wreath tutorial

This year, we are holding Thanksgiving at my home. As a college kid who commutes to school daily, I still live at home, so when my Mom found out, I was the chosen child to help plan for everyone coming over. I was probably more excited than any kid my age would be.

I quickly jumped on Pinterest and started researching side dishes, desserts, crafts, anything thanksgiving themed.

Once we got the menu down and how we wanted the layout for the dinner (we have a small ranch home, 2 bedrooms 1 bath) I opened my mouth with excitement once again and said I would do the decorating too.

I decided to make this wreath. I had no directions at all, I just winged it, and I'm so proud of it. Here is the full tutorial (with pictures for us visual folks!) so you can make this for your home:

This is what you will need to complete the first portion of this wreath...I went to Michaels and filled my cart, I didn't even know Michaels had carts but I'm so grateful they did.
I just chose a fall color scheme with hints of red. I really wanted to create something that could live on the front door for all of fall. Next year I will be able to bring it out sooner. This next part took me about an hour and half to complete. I just put on a movie and started...
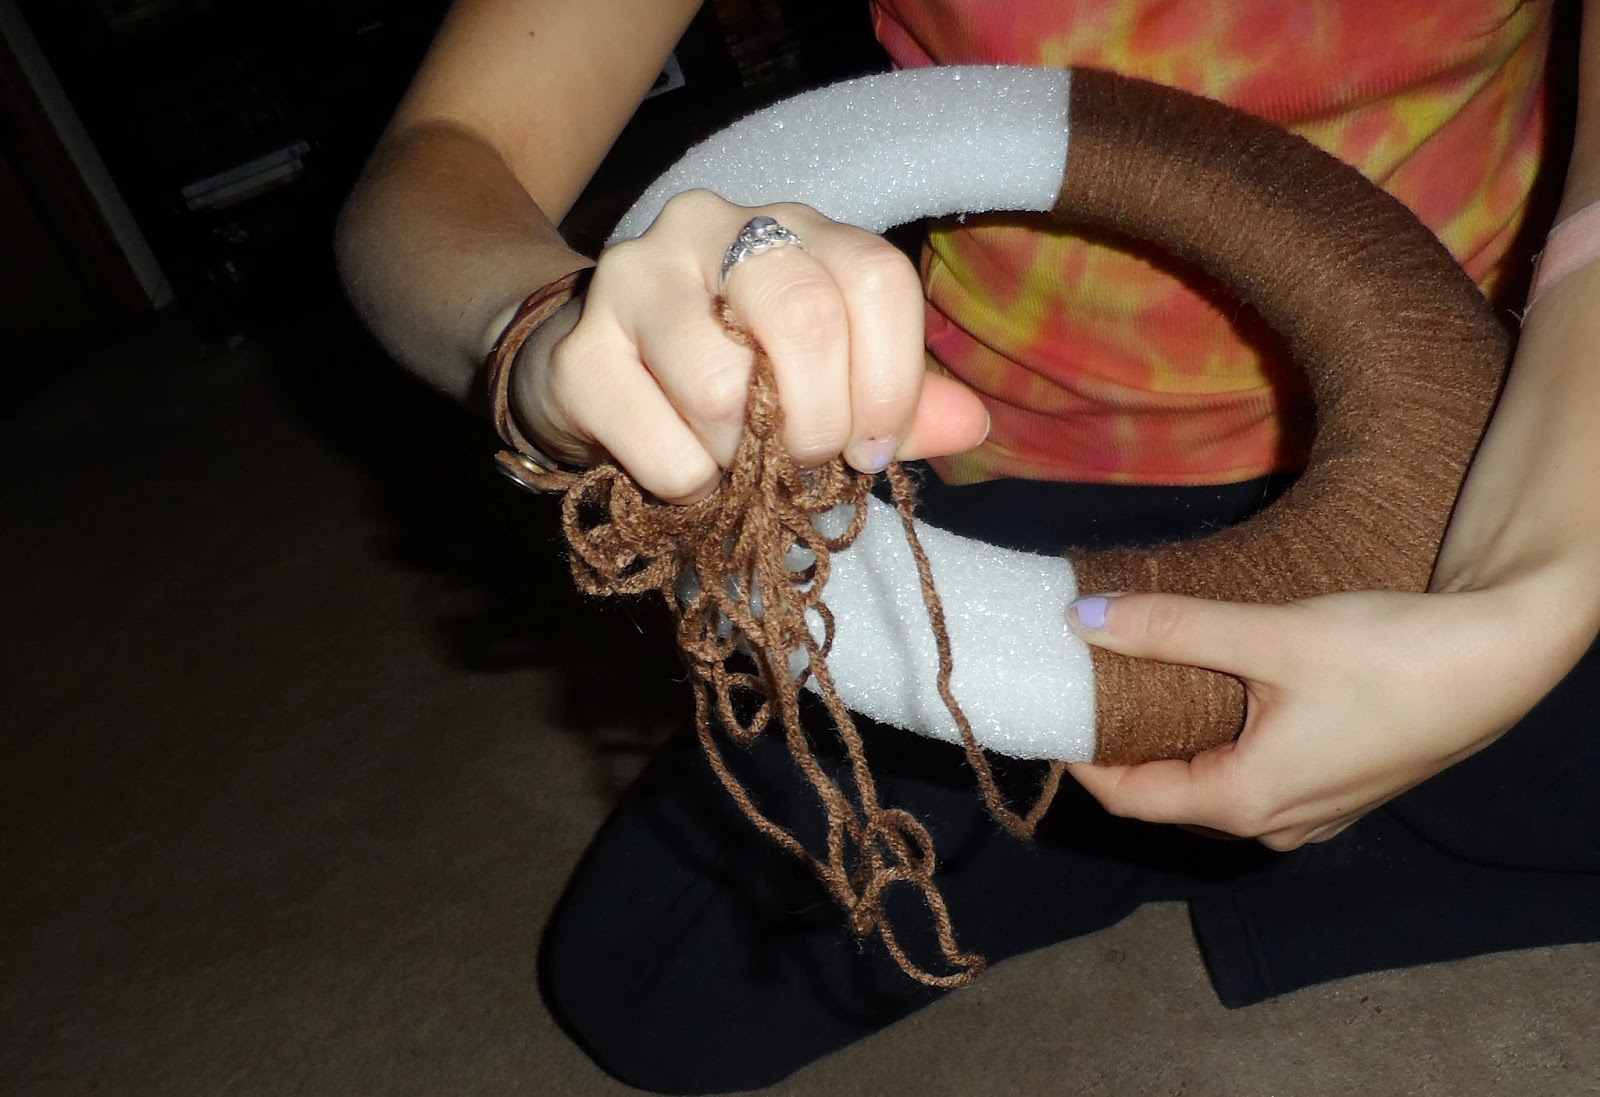
I chose to wrap the Styrofoam wreath with the brown yarn and introduce the red yarn later on. With my thumb I held down the previous wrapped area and with my right hand I took the yarn and just wrapped it around, I tried to make sure the tension was the same all the way through. 
I found it easier to cut a small portion of the yarn ball it up in my right hand and wrap that way. At first trying to get all the yarn through the wreath was tough. Once I figured that out I was flying along. That is until my yarn ball ran out...
Then I just cut more yarn ( I just pulled from the original yarn ball, usually counted to a double digit number as I pulled to guarantee I had enough slack) and took the old end and tied it to the new end. I then camoflauged the knots when I wrapped around that area. The styrofoam helped a bit and grabbed the fibers from the yarn so I didn't have to worry about it sticking out. 
An hour and a half later I flipped it over and had a perfectly yarn wrapped wreath. At this point it was midnight so I decided as much as I loved my new wreath sleep was much more important. Quick tip: When deciding between sleep and a wreath, always choose sleep. Sleep is always good. The wreath will be there in the morning.

So the next morning I took out my round two of supplies
You probably wouldn't need the cutting board but I was sitting on my living room floor, so the cutting board was needed. I decided to just use some left over card stock to use as a template and see if the size I cut out would fit my wreath. I was going for an argyle pattern, so squares was the name of the game. 
2" x 2.5" worked out well for the vision I had... with that I introduce the felt
I then layered all the felt together, took my template and figured I would need about 12 squares, so 4 per piece of felt. I drew on the top piece of felt and just cut the squares out.
I had 12 total squares now...then I took out my wreath and placed the squares around the wreath making sure no like colors were next to one another, that is until I got to the end and realized I needed an open space for my leaves and decorations
I then took my hot glue gun and started to glue down my felt pieces making sure to get enough glue to keep it secure over the long haul

Then just pat down your squares to make sure they stick as you go

The next thing I did was bring out my red yarn and started to pull it out and cut a small amount of yarn since I only needed it to go around twice
On the back side I just tied it and glued the red yarn to the brown yarn so it would stay, and made sure as I went the tension was the same.
Once I finished going around the one way, I started the other way and made sure the red yarn crossed over each other to make an "X" over the pieces of felt...
This is what it looked like when I was all done with my yarn wrapping
It's really pretty as is and if you wanted you could just stop there, but I knew what I wanted to complete it would make this already pretty looking wreath look gorgeous. 
I just ripped apart some fall garland I purchased, taking one berry cluster and some leaves from one and some flowers from a fall bouquet. With that I just stuck them into the wreath 
I made sure to hot glue the leaves and flowers to the wreath to secure them down 
then I added the finishing touch, the berry cluster and then hung it on my front door. Doesn't it just say "Happy Thanksgiving!" to you? No, just me then? Oh well I love it...

Wednesday, October 30, 2013

Avery Babe

World meet Avery. Avery meet the world. 


Avery is a purebred Australian Shepard. She is my boyfriends, Daniel, dog. The two of them are obsessed with one another. She gets very jealous when I kiss him, lay with him or we show any kind of PDA or love towards one another. She wants him to herself, and I completely understand, I'm the same way. 

(Sorry for the blurry photo but you get the idea, they are in love)

Just like Daniel picked out Sophie, I picked out Avery. I chose very wisely. Her brother was crazy when the two of us pulled up, he reminded me of the dog from Marley and Me with his behavior. We got Avery babe, as I lovingly call her on Christmas Eve. We went a few days before to look at her, sleep on it since it was kind of a whim and then we went back for her. But how could we say no to this face? It's been 2 years since this little lady has been in our lives and those have been the best 2 years...
Once we got her in the car it hit us, she didn't have a name and we were the ones who had to name her. We just started saying names like Emery, Holly (we really tried this one because I thought it was so fitting since it was christmas eve) and others until she looked at us. Finally we said Avery and she looked. Her fathers name was Avery, and having just took her from her family to join our new loving family we thought it would be a nice way to honor her first family. 
Avery is the only dog I know that will let you hold her anyway you want, she will let you use her as a pillow and she will lay just like a human in bed. 
She is also the only dog I know that will actually watch TV. I'm serious she has "her" shows that she loves. Anything with a dog is fair game, animal planet, Trailer Park Boys and King of the Hill are just some of her favorites. 
She loves to play. Tennis balls, especially the ones that make the squeaker noise are her favorite. She's not the best with her toys, she likes to destroy them but she is very protective of them. Also, her and Sophie are BFF, the two of them can play for hours. 
Avery is one of the best dogs I know. And I give all the credit to Daniel for teaching her everything she knows. While she is obsessed with him, she has her days when she is obsessed with me. My favorite thing about her, is she's a smiley dog. She seriously smiles. And every time you walk in the door she does this really cute butt shake that makes you just smile and love her more. 
She may be a bigger dog than Sophie but she is such a loving and friendly dog. I don't know anyone that has met her and not liked her. And, she loves to lay and be lovey. I will always pick her up like a little babe.

Oh and one more thing...more like a general warning. If you go to the bathroom, make sure you close the door all the way. Because she will push her nose into the door and open it leaving you embarrassed. Same when you take a shower, close the door all the way...or she may join you....